BIM Services
A Complete Guide on Scan to BIM 2026: What Architects and Engineers Should Know
-
 Sreela Biswas
 - June 12, 2026
- 6:14 am

U.S.-based local architectural representation, ensuring communication, accountability, and delivery expectations, managed close to the client.
Explore more
Discover our architectural design excellence through a curated selection of projects.
Explore more
Take a look at how Uppteam can elevate your projects with expert engineering solutions.
Explore more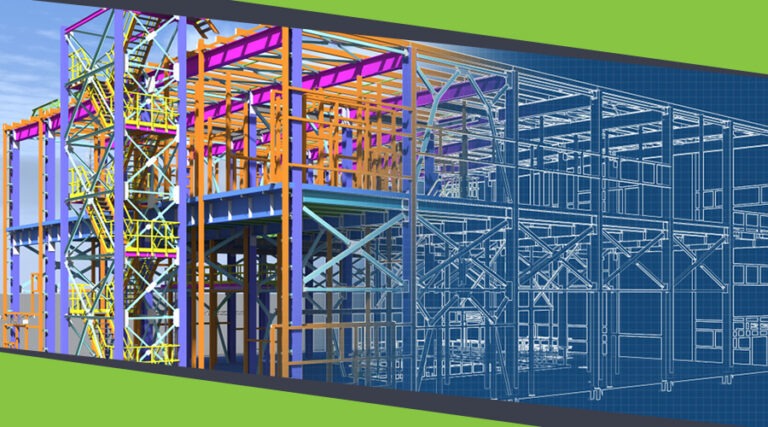
Our Structural Support Services can enhance your structural engineering projects with expert support.
Explore more
Uppteam delivers precise and reliable surveying and mapping solutions to help you make informed decisions.
Explore more
Whether you're working on residential, commercial, or industrial buildings..
Explore more
Uppteam’s Virtual Admin Support can help you with all your administrative tasks..
Explore more
Our experts work as your Second Eye Services expert.
Explore more
If you are working on a renovation or retrofit project, at some point you will receive a set of drawings and be told they represent the existing building. More often than not, they don’t, not fully. The walls moved. MEP systems have changed. Annexures appeared without updating the CD sets. And by the time you discover the discrepancies, you are mid-design.
Scan-to-BIM services exist to solve exactly this problem. Use laser scanning to capture a building exactly as it stands today and convert that data into a synchronized BIM model. Result? You get a reliable foundation to work from. One that truly reflects reality.
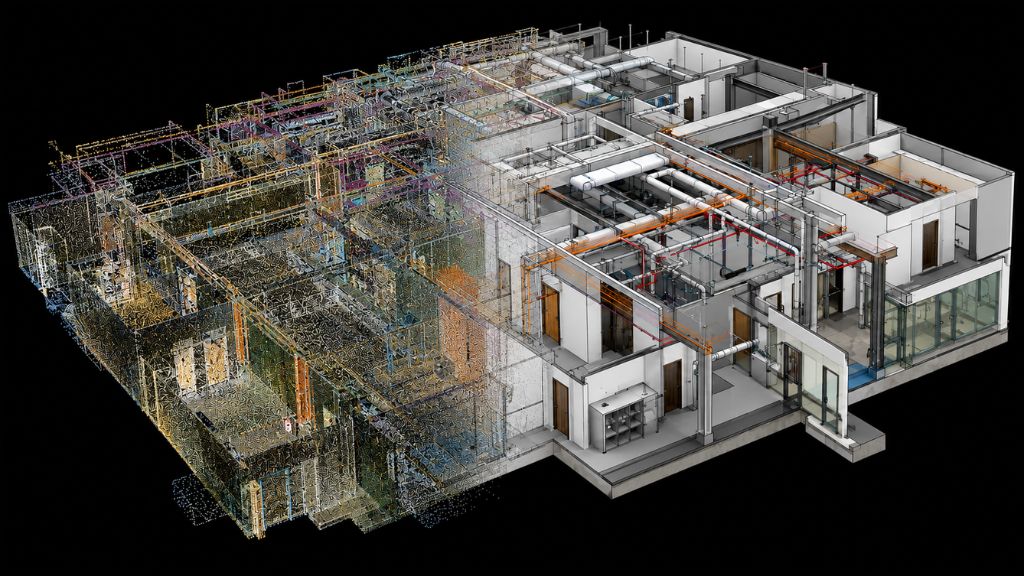
Scan-to-BIM is the process of using 3D laser scanning technology to convert an existing building into a Building Information Model. The capture produces a point cloud, a dense, 3D dataset of millions of calculated points. Together, they represent the building’s geometry as it actually exists. Laser scan-to-BIM companies take that data and use it as the reference to build a model in tools like Autodesk Revit.

The distinction matters. A point cloud is raw data. It’s accurate. But it’s basically a very precise 3D photograph. A BIM model is more structured. Your walls are wall objects; ducts look like ducts. Each element carries data about what it is, how it relates to other elements, and the level of detail to which you want it modeled.
Point cloud-to-BIM bridges these two by translating the scan’s accuracy into something a design team can actually build on.
You don’t need scan-to-BIM for every project. It is most valuable and most justified in the following situations:
If the cost of a design conflict or coordination error discovered on site exceeds the cost of the scan, you’d better invest in scan-to-BIM. For complex projects, that calculation almost always favors scanning.
Understanding the process end-to-end helps you know what you’re commissioning, what to provide at each stage, and what a quality deliverable should look like. Companies that offer point cloud-to-Revit modeling follow a consistent sequence, even when you share varied project specifics.
Before starting the scan, you must define the project scope. This includes specifying the Level of Detail (LOD) for each building element and discipline, the Level of Accuracy (LOA) for the captured data, the expected deliverable formats (such as Revit model, IFC, COBie), and any specific Revit templates or naming conventions you’d like to follow. These details show up in a BIM Execution Plan (BEP).
BIM engineers use Autodesk ReCap or Trimble RealWorks to capture and register multiple laser scan positions into a united point cloud. The quality of this registration directly affects the accuracy of the subsequent details.
Engineers cannot correct errors that occur at registration in the modeling phase. We typically deliver the registered point cloud as an RCP or E57 file loaded into Revit as the reference base.
Modelers trace and build each building element against the point cloud, working section by section. They model elements to the LOD you specify in the project scope. It’s a thoughtful level of detail matched to how that element will be used downstream.
A common misconception on LOD is that higher LOD always means better value. It does not. It means higher cost and longer timelines. The right LOD is the one that serves the project’s actual needs.
On an airport redevelopment project in New Jersey, our team worked on, most building systems required LOD 300 modeling. Still, we correctly specified the ground-floor elements such as slopes, curbs, sidewalks, concrete barriers, and street furniture at LOD 200. Applying LOD 300 to those elements would have added significant time with no downstream benefit.
Where scan data is incomplete due to occluded areas, something we often see in dense MEP environments, experienced modelers cross-reference available documentation, project folios, and engineering logic to fill gaps accurately instead of making assumptions.
On that same airport project, point cloud data for conduits, cable trays, pipes, and ducts had gaps in certain areas. We verified each element against the client’s project documentation before including it in the model.
Complex projects generally include manufactured components, proprietary duct fittings, or specialist equipment that don’t exist in any standard library. These need to be built as custom Revit families at the correct LOD and with the correct parameters.
Custom family creation is time-consuming and needs to be identified and scoped before modeling begins. A trustworthy scan-to-BIM service provider will audit the project requirements at the scoping stage and flag any components that will require custom families, so the time and cost are known upfront.
Designers use Navisworks to look for clashes among architectural, structural, and MEP designs. If you’re renovating a building, this helps you catch conflicts between existing conditions and proposed new work before they reach your construction site. Identifying and resolving clashes in the digital model is much cheaper than discovering them on-site.
A complete deliverable includes clean naming conventions, proper family structure, and any additional exports agreed during our scoping. For example, IFC for interoperability, COBie for facilities management handover, and point cloud data in the agreed format.
We do a final QA check of the point cloud to confirm that the modeled elements align with your scan data.
Most scan-to-BIM problems are process failures. The four most consistent causes are:
When you treat LOD as a single project-wide number rather than an element-by-element specification, the model either costs more than it should or doesn’t serve your team’s needs.
In compact MEP environments, blocked areas often appear. The risk lies in how a BIM company handles them. Modeling what “should” be there based on assumption rather than cross-referencing available documents introduces errors that are expensive to fix later.
When you discover mid-project that you need to build specialist components from scratch, it creates timeline and budget pressure that neither you nor the modeling team anticipated.
If you don’t check your model against its source data, consider it unverified. Confirming that your modeled elements land within the agreed accuracy tolerance is a must. After all, when it comes to trustworthiness, your deliverable deserves to look sharp!
In-house scan-to-BIM capability requires specialized licensed software, trained modelers, and consistent project volume to justify the investment and keep that team productive.
This is why companies that offer scan-to-BIM support have become the practical default for a large share of the market, particularly in the U.S. The project economics are clear-cut: access to a specialist team on a per-project basis, with no overhead for the periods between projects.
When evaluating a scan-to-BIM firm, look past general capability claims. The questions that actually matter are:
For scan-to-BIM services, particularly for USA-based projects, a partner familiar with USIBD LOA requirements and domestic accuracy standards significantly reduces friction.

A few developments are worth noting if you are commissioning scan-to-BIM work this year.
Automated extraction can identify and classify standard structural elements such as walls, columns, and slabs, significantly reducing processing time. However, this efficiency is concentrated in the geometric interpretation phase. Custom families, mixed LOD compliance, and multidisciplinary coordination still require experienced judgment.
Field capture is now typically the smaller portion of the overall project budget. The modeling, coordination, and QA work consumes the majority of the cost. This matters for you when you’re evaluating proposals. A provider who prices cheaply on scanning but vaguely on modeling often absorbs costs in the phase that carries the most value.
Revit models should now routinely include IFC exports or COBie data depending on your project type. Healthcare redevelopment, adaptive reuse, infrastructure, and heritage preservation are all active areas of demand for laser scan-to-BIM services.
Scan-to-BIM provides you with an accurate digital representation of your existing building conditions, reducing risk during design, coordination, and construction.
However, the quality of the outcome depends on the process behind it. For example, LOD requirements, verified scan gaps, custom family planning, and rigorous QA are steps in our process for producing a model your teams can rely on.
The difference between those two outcomes lives almost entirely in the process and the team behind it. At uppteam, we work with architects and engineers just like you on complex scan-to-BIM projects across the U.S., making your lives easy. If you are reviewing a project scope and want to discuss what a well-structured engagement looks like, we are happy to start that conversation.