Structural Design Support
From Shop to Site: How Offsite & Modular Design Changes Structural Detailing
-
Sreela Biswas
- October 9, 2025
- 11:36 am
Complete Architectural Construction Document Production In Your Company Standards
Our degreed and trained architectural designers in India work as an extension of your staff on a monthly and hourly subscriptions.
Uppteam’s licensed expert MEP designers, operating remotely, collaborate with US AEC firms to deliver code-aligned MEP design solutions.
Offshore structural design experts deliver top-quality, code-compliant designs and documentation for US projects.
Seasoned civil designers remotely provide unmatched support for advancing site development, grading, and utility plans with sheer accuracy.
Cutting-edge 3D modeling and clash-coordinated documentation empower construction-ready
project delivery.
Dedicated offshore admin teams streamline architect, contractor, and engineering workflows.
Independent and guaranteed error-free model audits, clash detection, and construction
document verification by a specialized team.

U.S.-based local architectural representation, ensuring communication, accountability, and delivery expectations, managed close to the client.
Explore more
Discover our architectural design excellence through a curated selection of projects.
Explore more
Take a look at how Uppteam can elevate your projects with expert engineering solutions.
Explore more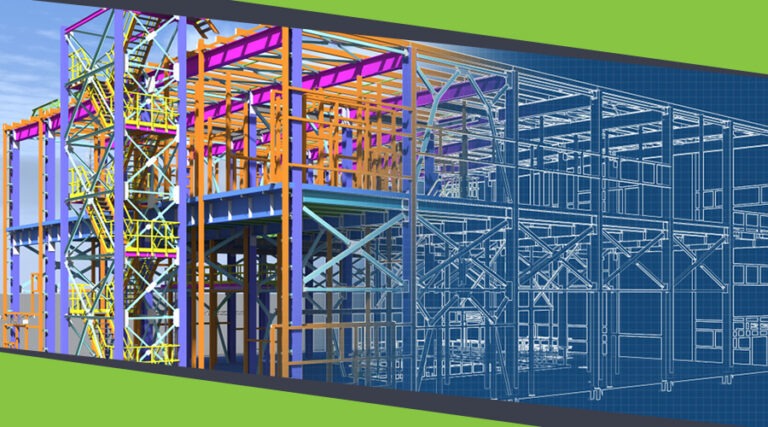
Our Structural Support Services can enhance your structural engineering projects with expert support.
Explore more
Uppteam delivers precise and reliable surveying and mapping solutions to help you make informed decisions.
Explore more
Whether you're working on residential, commercial, or industrial buildings..
Explore more
Uppteam’s Virtual Admin Support can help you with all your administrative tasks..
Explore more
Our experts work as your 3rd party quality control support partner.
Explore more
Offsite and modular construction shifts a massive part of the work from a muddy site to a tidy factory. That’s great for quality and speed, but it changes everything for structural detailing. When modules roll off the line, small gaps, loosened bolts, or an ambiguous connection detail can turn a neat factory finish into a site headache. This article guides designers through the practical detailing steps that make modular projects buildable, predictable, and clash-free, with a focus on clash-minimization practices, tolerance stacks, and a supplier coordination checklist that you can actually use.
Why it matters right now:
Modular and offsite construction are not niche. The U.S. modular market alone was valued at tens of billions in 2024, and offsite methods are outpacing certain parts of the broader construction industry as teams pursue speed, quality, and reduced site disruption.
That growth brings more designers into direct conversations with factories. National and industry guides now recommend clearer, earlier collaboration between project designers and manufacturers to realize the benefits of offsite construction.
Designing a factory-built module isn’t the same as designing a stick-built wall. Below are the four detailing areas that most commonly trip up projects, and what designers should do differently.
In a factory, you can get tight dimensional control, but modules will still change during lifting, transport, and on-site mating. The sum of those individual variances, the tolerance stack, is what kills fit-ups if you ignore it. A tolerance analysis is a straightforward spreadsheet exercise, but it should be part of the structural package from the outset.
Quick example (how stacks add up):
Imagine a module-to-module floor alignment that needs to be within ±10 mm at final assembly. Typical contributors might be:
Add them step-by-step:
3 + 5 = 8; 8 + 7 = 15; 15 + 3 = 18 mm total possible error → that exceeds the ±10 mm requirement. That indicates the design or process must change (tighten tolerances, add alignment features, or allow in-field adjustments). See the calculation? It’s small math but huge consequences. (If you need a spreadsheet template for tolerance stacks, treat this as the first deliverable.)
Practical moves:
A drawing that shows a generic “bolted connection” isn’t enough. Fabricators need:
Design for temporary conditions. A module may rely on temporary bracing during transport and then become structural when connected. Detail which members are temporary and describe how the transformation occurs, including bolt sizes, weld notes, and allowable field adjustments, all of which are clearly specified. Monash and other modular handbooks emphasize that connection detailing must reflect both fabrication and erection phases.
Modules experience different loads in transit than they do when they are part of the finished structure. Designers must specify:
A recent wave of heavy industrial modular projects, ranging from LNG skids to prefabricated plant modules, reveals both the benefits and drawbacks of this approach. Offsite construction saves time, but transport damage and coordination complexity increase if lifting and transport loads aren’t integrated into the structural detail set.
Offsite handles a significant portion of the MEP work within the factory. That’s a plus, but it means structural openings, penetrations, and embed plates must be placed to millimetre accuracy. Common practical safeguards:
Yes, run clash detection in BIM. But for modular projects, that’s table stakes; the real value comes from using clash tools to drive contracts, not just find model problems.
Best practices:
Use assembly sequencing (4D) to surface temporal clashes; modules that physically fit may still conflict in lift sequencing, crane reach, or staging areas. Model the erection sequence to reveal these early.
Below is a working checklist designers can include in the tender/contract package for any modular project. Keep it tight; clearly assign responsibilities, and insist on confirmation before fabrication.
You can’t shrink every tolerance to zero, and it’s best not to try to do so. The goal is to target the critical interfaces and reduce risk where it’s most painful.
Actions that give big wins:
Use pre-assembly trials for atypical interfaces: build a mock-up module and test mating, lifting, and transport packaging before committing to the whole run.
A simple timeline anyone can use:
Best practice is to assign a single owner for module interfaces (designer or PM) who keeps the checklist moving and owns the clash matrix. This avoids the “everyone assumed someone else sorted it” problem.
Offsite and modular construction tilts the table toward predictability and repeatability. But to get there, you must treat the design package as a fabrication manual, not just an aesthetic sketch. Run tolerance stacks, detail connections for both fabrication and erection. Use BIM, yes, but attach real QA and contractual teeth to what models show.
If you’d like, Uppteam can help translate your drawings into fabrication-ready details, including tolerance stack spreadsheets, shop drawing QA, BIM clash regimes tailored to modular workflows, and supplier coordination packs that factories will appreciate and site crews will thank you for. Ready to reduce those surprises between shop and site?
Your One-Stop MEP Design Support Solution is Here
Hire Remote Team at an Affordable Price!